Breaking

Saturday, 15 April 2023

April 15, 2023

Asus Unveils Latest Gaming Phone Duo: ROG Phone 7 and ROG Phone 7 Ultimate Powered by Snapdragon 8 Gen 2

Asus, a leading global technology company, has recently announced the launch of its much-awaited Asus ROG Phone 7 series in India, catering specifically to the gaming community. The series comprises two models, Asus ROG Phone 7 and Asus ROG Phone 7 Ultimate, which have been the talk of the town for quite some time now, building up the excitement among tech enthusiasts. These smartphones come equipped with advanced cooling solutions to ensure uninterrupted gaming experiences.

The Asus ROG Phone 7 series serves as the successor to the Asus ROG Phone 6 series, which was released in July 2022. Both models are slated to go on sale in May and promise an exceptional gaming experience to consumers. The base variant, Asus ROG Phone 7, is priced at Rs. 74,999 and offers a maximum RAM of 12GB and internal storage of 256GB. On the other hand, the higher-end variant, Asus ROG Phone 7 Ultimate, is priced at Rs. 99,999, offering a whopping 16GB RAM and 512GB internal storage.


Both models come in Storm White, while the base variant is also available in an exclusive Phantom Black colour variant.

The Asus ROG Phone 7 and Asus ROG Phone 7 Ultimate are dual nano-SIM phones that run on the Android 13 operating system with ROG UI and Zen UI interfaces, respectively. They boast a stunning 6.78-inch full-HD+ (2448 x 1080) AMOLED display with a refresh rate of 165Hz and a touch sampling rate of 720Hz. The display offers a peak brightness of up to 1000nits and has a pixel density of 395 ppi, providing an immersive visual experience to users.

The smartphones are powered by the Qualcomm Snapdragon 8 Gen 2 SoC, paired with an Adreno 740 GPU, and feature up to 16GB LPDDR5X RAM and up to 512GB UFS4.0 internal storage, providing users with ample space to store their data and run applications seamlessly.

The camera specifications of both models include a triple rear camera setup, consisting of a 50-megapixel Sony IMX766 primary sensor, a 13-megapixel ultra-wide lens, and an 8-megapixel macro lens. The front camera features a 32-megapixel sensor for capturing high-quality selfies and video calls.


The Asus ROG Phone 7 series is equipped with a powerful 6,000mAh battery that supports 65W wired fast charging, ensuring that users can spend more time gaming and less time charging. The smartphones also offer a host of connectivity options, such as GPS, NFC, Bluetooth v5.3, and Wi-Fi a/b/g/n/ac/ax, among others. Additionally, they feature an IP54 rating, providing protection against dust and water splashes.

With dimensions measuring 173mm x 77mm x 10.3mm and a weight of 239 grams, the Asus ROG Phone 7 series is sleek and compact, making it easy to handle and carry.

In conclusion, the launch of the Asus ROG Phone 7 series in India has been much-awaited and anticipated, given its advanced features and superior gaming capabilities. With its powerful hardware, stunning display, and exceptional camera specifications, these smartphones are set to take the gaming experience to the next level.
April 15, 2023

World's Most Popular Sports Tracker Gets Massive Redesign, Wearable as Necklace

In the ever-evolving world of wearable technology, sports trackers have become increasingly popular due to their ability to provide users with real-time information about their physical activity. One such sports tracker that has gained immense popularity among fitness enthusiasts is the redesigned version of the world's most popular sports tracker, the Xiaomi Smart Band 8.

This sports tracker, which has been redesigned by Xiaomi to incorporate a host of new features and functionalities, is being touted as an incredible value proposition for users. It not only provides real-time information about a user's physical activity but also has the added benefit of being wearable as a necklace.


The redesign of this sports tracker is a testament to the growing demand for wearables that offer both style and substance. The Xiaomi Smart Band 8 has been given a sleek and modern look, with a range of new color options to choose from. Additionally, the device is now even more user-friendly, with a revamped user interface that makes it easier to navigate and access various features.

Xiaomi seems to have completely redesigned the Xiaomi Smart Band 8. The gadget no longer comes in a cheap-looking rubber strap, but it gets watch-inspired lugs that make it look so much more stylish.

One of the most significant improvements in the redesigned sports tracker is its ability to track a range of physical activities, including running, cycling, swimming, and more. The device can also monitor heart rate, calories burned, and distance traveled, providing users with a comprehensive view of their physical activity.


The sports tracker also incorporates a range of social features, allowing users to connect with friends and share their progress. This is a valuable feature for users who are looking for motivation and support as they work towards their fitness goals.

The price of the upcoming Xiaomi Smart Band 8 will e unveiled on the day of its official release, on 18th April, 2023.


In conclusion, the redesigned sports tracker by Xiaomi is an excellent value proposition for users who are looking for a stylish and functional wearable that can help them stay on track with their fitness goals. With its range of new features and functionalities, the device is sure to appeal to a wide range of users, from fitness enthusiasts to casual users who are looking to improve their physical activity levels.

Wednesday, 16 January 2019

January 16, 2019

boAt NIRVANAA Bliss CE-1 In-ear Headphone Review.

Hello Everyone.

In this section I am reviewing boAt NIRVANAA Bliss CE-1 In-ear headphones. I am personally using this for over 3 months now and I am going to share the overall experience of using this product.


Key Specs:

  • In-ear type Headphones
  • Inline Remote
  • Noise cancellation
  • 3.5 mm jack
  • Tangle resistant wire
  • Built-in Microphone
  • Deep Bass
  • Ornamental Sound

In the box:

  • Headphones
  • Warranty card
  • Headphone carrying hard case
  • Three pair earbuds (2 pairs extra, 1 pair fitted to the headphones)

Compatibility:

  • Compatible with laptops, mobiles, tablets, Audio devices

Warranty:

  • 1 year
  • Covers only manufacturing defect
  • Physical damage excluded

Colours:

  • Black
  • White

Availability and Pricing:

  • Available for purchase from Flipkart
  • Costs about INR 1000

You can purchase the products by clicking on the following links:

  1. boAt NIRVANAA Bliss CE-1 wired headset with Mic (Glazy White)
  2. boAt NIRVANAA Bliss CE-1 wired headset with Mic (Glazy Black)

My experience and review:

My experience with the product is quite good. A quality product at this price. Nice sound quality with good bass and a beautiful ornamental sound. Very clear sound without any irritation to the ear. It comes with an Inline remote and an Inline Mic with Noise cancellation feature. The wire is thin yet sturdy with a premium feel. The wire is also Tangle resistant, means it will not get tangled or become messy like the regular headphones become. The audio jack is gold plated for clear audio transfers and connectivity. The earpieces are made of Ceramic which gives it a shiny and premium look. Also, it comes with a preinstalled pair of earbuds of medium size and 2 extra pair of small and large size earbuds are packed inside the box. The Packaging is quite good and surprising to see. The box also contains a Leather-like carrying case for the protection of the headphones while carrying around. There is a warranty card in the box. We need to register the product as soon as we receive the product to claim the 1 year manufacturing warranty. I can say even after using it for 3-4 months now that it's quality hasn't dropped. It feels the same as it felt when new. I must say if you like ornamental sounds with a good amunt of bass, go for it. There are two colours available for this model - Glazy White and Glazy Black. You can buy these headphones by visiting the above links. 

Here are few photos of my headphone:


~Single Earpiece with medium sized Earbud


~Beautiful Ceramic finish


~Lit up photo of the Earpieces


~Packaging box for the Headphone


~Full view of the Headset with Tangle free 


~Gold plated 3.5 mm jack


~Noise cancellation mic with inline remote


Friday, 27 April 2018

April 27, 2018

Top blogging blogs to follow and improve your blog from Zero to Hero | 2018

Blogging is the way to share our thoughts and experiences, teach others the thing we know, provide tutorials like how-tos or giving instructions, promote or review a product, share your own story and many more.

In this post we covered about some of the top blogging blogs we should follow in 2018 from where we can get knowledge about blogging, how to write a compelling blog, growing our blogs, online marketing, SEO tips and tricks and a lot more. Let's take a look.

BloggingTips.com
   In this blog we can find advices, guides, news etc. about blogging and they aim to help blogger to build up their blog. As a newbie I too followed their blog and I follow them still. They have lots of tips about new/experienced bloggers and following them can make the blogging experience easy and smooth.
Blogger Tips Tricks
    This blog can help you to take your blog from nothing to an attractive and well performing blog as this blog contain some cool tips and tricks for you. They have full guide articles for newbie as well as experienced bloggers. They bring up many tutorials for bloggers and help people build their blog more efficiently. I personally follow their blog too.
DailyBlogTips
     They provide support for your business, building a blog, making money with blog and many more. They have blog post which can help everyone – be you a newbie or an experienced one, they have posts for everyone. Anyone can build their blog to a pretty good stage by following their tips.
Copyblogger
     Copy Blogger is useful for them who wants to learn useful and important things about blogs and blogging. You can learn how to write good and attractive blogs, know about online marketing, etc. You can improve your blog more by following them. They have everything you need to know about blogging.
The Blog Stylist
      You can get answer about almost every question here arising on your mind. They have simple blogging tips to large online solutions. You can find and solve problems and know about many useful things about blogs and blogging. They have many tools which will be helpful in blogging. I follow their blogs almost daily.
ProBlogger
      This blog again aims to help bloggers learn the perfect way for blogging. With their huge number of articles about different tips and tutorials, they made it sure that everyone who visits them will surely learn a lot about blogging and take their blog to the next level. They have guest posts too from other professionals. Whether you are a newbie or a pro, this blog can help you in any way possible. I follow them too.
BlogBasics
      As their name states, you can find every basic things about blogging to pro tips and suggestions. Every newbie will find this blog useful as they have step-by-step guide on everything a newbie needs to know. I follow them still today.

So these are some blogging blogs you can follow to grow your blog to the next level. I follow them all personally and I can give a thumps up for each an every blog listed here. They help me a lot and I am gaining knowledge from them everyday. Make sure to follow them. I didn't included the links to their blogs but you can find them out by simply typing their blog name on the google search bar. and believe me you will see some quality posts from them which can help you grow your blog to the next level. 

Hope this article will be helpful to you.

Like, share and subscribe :)

Thursday, 15 March 2018

March 15, 2018

How to get a copyright registration for your Blog | Blogger Tutorials

These days plagiarism is a major concern for the bloggers. Imagine this- You wrote a blog about a topic in your words after doing a hell lot of research and typing them. You spend a quality amount of time editing and writing it. And then you published it. You are happy to see some visitors in your post. But then you came to know that someone just copied your content and used it on their blog and also they are having some visitors in that post which is actually yours. This will make you sad and furious too. You have done all the hard work and someone else is enjoying the fruit. So, if you don't want this to happen then all you need to do is get a copyright registration done for your blog. So lemme tell you how to do it. Please do follow the following steps to do it. 

How to get a copyright registration for your blog?

-- Go to copyrighted.com.


-- Click on GET STARTED.

-- A form will appear for signing up. Please fill up the form. It will be better if you provide that email address which you used to signup for blogger. 

-- On the next page provide that email id again and then submit it.

-- A confirmation link will be sent to that email address you provided. Go to your email. You will see a mail from copyrighted.com. Open that mail. You will see a link to confirm your email. Just click on that link to confirm it.

-- Now you will be redirected back to the website and your email address will get confirmed.

-- On that page provide your blog's URL (http/https://www.yourwebsite.domain). And then provide your website's name (yourwebsite). Then submit/save it. 

-- On the next page click on badge. Select the desired badge you like and copy the HTML code.

-- Now go to blogger>layout. Go to the bottom of the layout. Click on +Add a gadget. Now select the HTML/Javascripts Gadget. On the title option type COPYRIGHT. And on the content box paste that HTML code. Now save it.

-- Now click on VIEW BLOG and go to the bottom of your page and you can see the copyright badge on your page. Click on the badge and you can view the copyright registration certificate of your blog.

That's all for now. Hope this will help you.

Please do like, share and follow us.

You can subscribe to us with your email so that you can receive all our latest post straight to your inbox.

Stay tuned.  :)

Sunday, 4 March 2018

March 04, 2018

How to remove websock.exe CPU miner trojan from your pc | Virus removal tips

Websock.exe is a part of Trojan Horse which uses the resources from the infected PCs to mine digital money without the permission of the user. The Websock.exe CPU miner comes along with some free software that you have downloaded and installed from untrusted sites. They don't disclose the fact that some other malicious programs are also going to be installed on your PC along with the main software or file that you have downloaded. 

Once installed on your pc the Websock.exe will use up 70%-90% of your CPU's and Graphics Card's power. You will notice that whatever task you intend to do on your PC will lag and slow down. Games will freeze, web pages will become unresponsive, any new window page will show 'not responding' error. This is because of the Websock.exe which is using up your PC's resources to mine currency for themselves. You PC will become hot and you will notice the internal fan in your PC is running at a very high speed which indicates that your CPU is being used up very rapidly. Continous heating of your PC will shorten the life of the CPU. 

You will see a program Shadowsocks Version 1.0 is installed on your PC. Service.exe or Winsock.exe is using up a lot of CPU's and Graphics Card's power. Windows are freezing and often opening and minimizing slowly. Every single task is processing slowly. You will also see that your PC is restarting very slowly and the icons on the desktop are loading slowly. Every process depends on the CPU and when that malware is using up the CPU's power it is needless to say that everything else will load slowly. 

Also when you will try to close those programs manually by going to the Task Manager and clicking on the End Task button, you will notice that the programs are not closing and they are running despite all your efforts to close them. These programs are generally hidden from sight and they don't open a window like all the other programs. 

So in order to close and delete these programs follow the steps.

STEP 1: Uninstall Shadowsocks Version 1.0 from your PC.

STEP 2: Use AdwCleaner to remove Websock.exe from your PC.

STEP 3: Install and use Malwarebytes to scan and delete unwanted programs and malware.

UNINSTALL SHADOWSOCKS VERSION 1.0 FROM YOUR PC

For Windows 8 and 10

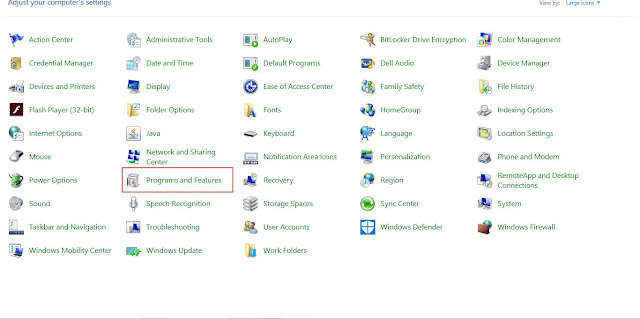
--- Open the Control Panel.


--- On the Control Panel window click on Programs and Features option.


--- Then from the list find Shadowsocks Version 1.0, right-click on it and click on Uninstall.
--- Shadowsocks Version 1.0 will be uninstalled from your PC.

For Windows 7 and Vista

--- Click on the Start button and select Control Panel.

--- Click on Uninstall a Program under the Programs category.

--- From the list find Shadowsocks Version 1.0 and click on Uninstall. 

--- Shadowsocks Version 1.0 will be uninstalled from your PC.

The program can have a different name on your PC. So to locate it right click on the "Uninstall a Program" page and sort the list by the "Date". If you find any unwanted programs that have installed without your knowledge and permission, Uninstall it.

! If you don't find any malicious program installed on your PC then proceed to the next steps.

USE AdwCleaner TO REMOVE WEBSOCK.EXE FROM YOUR PC

AdwCleaner is a product that scans the system and finds the Websock.exe and other malicious programs that have been installed on your PC without your knowledge.

--- Download AdwCleaner from the link below.

     Click here to download the AdwCleaner. (Direct download from this link)

--- After the completion of download double-click on the downloaded file to perform a system scan. If Windows shows a dialog box whether to run this program or not, click on Run or Yes.

--- After the program opens click on the Scan button to start the system scan. Now the program will search for Websock.exe and other malicious programs on your PC.

--- After the scan completes click on Clean button to clean all the detected files from your PC.

--- This will prompt a dialog box asking you to close all the other programs running and save all the work you are doing on your PC because AdwCleaner needs to restart your computer to complete the cleaning process. Please do so.

--- After the computer restarts, you will see that the program removed all the infected files from your computer and Websock.exe is removed. You can see the details of the files that were removed from your PC in a log file that is automatically opened by the AdwCleaner. Review the log file and close the notepad.

INSTALL AND USE MALWAREBYTES TO SCAN AND AND DELETE UNWANTED  PROGRAM AND MALWARE.

Malwarebytes is a powerful tool to detect and remove all the Trojans, browser hijackers and other types of malware from your PC. 

--- Click here to download Malwarebytes

--- After downloading the file double-click on "mb3-setup-consumer" file to install Malwarebytes on your computer. Click on YES in the prompt window

--- After the installation process begins the Malwarebytes setup wizard will guide you through the installation process.

--- Once the program is installed it will automatically start and update the antivirus database. Click on SCAN NOW to start a system scan.

--- Malwarebytes will start the scan and it will take some time to complete the process.

--- When the scan is finished Malwarebytes will show a screen which contains all the detected file on your PC. To remove the detected files click on "Quarantine Selected" button.

--- Malwarebytes will quarantine all the detected malicious programs on your PC. To complete the removal process it may ask for a restart to your PC. Please do so.

--- After it has removed the malicious programs you can close the program.

\Remember to scan your PC with this tool time to time. 

Before downloading any cracked file or something like that from the web please do check for reviews and then download it. It may contain a malicious file that may harm your PC. Keep an activated antivirus if you wish to so that you can check for viruses and malware time to time. Keep your PC safe from attacks.

That's all for now.

Hope this article will be helpful for you.

Please do like and share and comment below.

You can subscribe to us with your email so that you can receive all our posts directly to your inbox. 

Tuesday, 27 February 2018

February 27, 2018

How to add custom social links, about me/us and custom template in blogger | Blogger tutorials

Hi

Today we are going to know how to-

--add custom social links to your blogger website

--add "About me/us" using HTML coding

--edit your blogger template/add a custom template to your blogger website

Use of social links, about me/us and custom blogger template

--With social links on your website, users can directly connect to you through your social ids. When you add your FB, Instagram, Twitter, Pinterest or other social media links to your website, users can click on them and go to your social ids and message you, like your posts on social media, etc.

--Adding an "About me/us" in your website or blog helps the users know about you briefly. You can write about yourself and the other person who is helping you to build this website. This should be small and simple within a few lines.

--Now this plays an important role in your blog or website. Adding a custom template means editing the template provided by blogger and adding a third-party blogger template to your blog or website. There are different types of blogger templates on Google available for free and paid. A custom template is SEO friendly, have a good user interface and makes your blog look professional.


So, without wasting more time let's get into it.

How to add custom social links to your website

You can do this by going to Layout>+Add a Gadget>More gadget>Search for social>POWr social icons. But this involves a lot of editing and stuff. Also, you will get stuck between free and paid versions. So, let me tell you how to do it easily. It involves coding but hey, don't get nervous if you don't know how to code. Blogger will do this for you.

Download this free Social media icons

1) Download free social media icons (FB, Insta, Twitter, Pinterest, or others) from the web or from the link above in png or jpg or jpeg format and save them in a seperate folder.

2) Go to blogger.com, log in to your account. Now, go to Posts>New Post. 

3) Here is the trick. Go to Insert Image>Choose file. Upload all the social icons from that folder where the icons are saved. Add them to the post page. Drag them to change their position and arrange them.


3) Now the icons are placed. Let us embed our social media links into them. For example, you want the user to go to your FB profile by clicking on the FB icon on your website. So to make this happen you need to link that icon with your FB id link. Open your Fb account in a new tab. Go to your profile. Now copy the link to your profile. Come back to the blogger tab where the post is open. Single click on the FB icon. This will highlight it. Keep it highlighted. Now click on the "Link" option next to the insert image option in the toolbar.


4) A new pop-up will open. Place your social media profile link under Which URL should this link go to? box. Make sure to Check the box of Web Address and Open the link in new Window. Don't click on Add 'rel=nofollow' attribute. Then Click Ok

Do this for all the social media icons. After you are done embedding the social links to the icons click on HTML. Follow the image below.


You will get the HTML codes for the icons and links you have created. Copy the HTML code. Image below.


--After copying the HTML codes just save and close this post. Don't publish it. 


--Now go to Layout>+Add a gadget (In the place where you want to place your social icons on your blog). If you want your social icons to appear on the left sidebar then click on +Add a gadget on the sidebar and if you want your social links to be on the footer of your blog then click on +Add a gadget on the footer of your blog.

--After clicking on +Add a gadget, go to Basics>HTML/Javascripts. Now on the content box paste the HTML codes you have copied. Give a title, say "SOCIAL". After pasting the HTML, click save.


--Now click on Save Arrangement on the layout page on the top right corner. After the click on view blog. You will see the social links in the desired position on your blog. (You can see the social links placed in the footer of this blog). 


So, these are the steps you can follow to add your social links to your blog. If you have any problems, let us know in the comment section. 

How to add custom "About Me/Us" in your desired position on your blog

This is also similar to adding social links. Follow these steps:

1) Go to Posts>New Post. 

2) On the page add a photo of yours and your co-authors (if any). Remember to keep the photo in the center.

3) Now write something about you and your co-authors under the photo. Try to keep the writing short and simple.


4) After writing about yourself and all click on HTML on the top left corner beside the Compose option.

5) Copy the HTML codes and save and close the post.

6) Go to Layout>+Add a gadget>Basics>HTML/Javascripts. (Click on +Add a gadget on the location you want your "About me/us" to appear on your blog, say, on the sidebar) 

7) Paste the copied HTML code into the Content box. You may or may not add a title. After pasting the codes, click on Save button.

8) You will see the HTML/Javascripts gadget on the layout on your selected position. Click on Save Arrangement. After that click on View Blog. You will see your "About Me/Us" on your blog on your desired place.

So these are the steps you can follow to add a custom "About Me/Us" on your blog.

Let us know in the comment section if you are having any problem.

How to add a custom template on your blogger blog

For this, first, download a custom template from the web according to your specifications and desire. You can have the paid and free templates from the web.

After you have downloaded the templates extract the zip file and keep the template file in a separate folder. A template file will be a .xml file. 

Now go to Blogger>Theme>Backup/Restore. Here, keep a backup of your current template. Save it on a separate folder on your pc. After saving a backup, click on Choose File. Now select the .xml file from the folder on your pc where you have saved it earlier. After selecting the file, click on upload. Within a few seconds, the custom template will be uploaded to your blog. 

Now you can click on View blog and see your blog. You will see that the template has been changed but there is no loss of any content that was earlier present. Cheers! 

If you want to edit the template or want to add/remove some gadgets from the custom template, just go to layout and click on edit on the desired gadget to remove/edit it. Remember to click on Save Arrangement after every edit on the layout. Otherwise, changes will not appear on your blog. So now you are done customizing the blogger template.

That's all for now.

Hope this article is useful to you.

Do like, share and subscribe.

You can subscribe to us through your email so that you can receive all the latest post straight to your inbox. We keep on writing about tech stuff, stories, post photos etc. all of your interest.

We are live on the Google Play Store now. Click on the badge below so that you can get us straight from the Play Store. 


Monday, 26 February 2018

February 26, 2018

How to convert your website to an Android app and publish it to Google Play Store for free | Tech tips

Hi

Today we are going to learn how to convert your website to an Android app and Publish it to the Google Play Store for free. Let's get into it.

A lot of you have a website, it may be a blogging website or anything else. This article is for them who are having a website and wish to convert it into an app and also publish it to different app stores for increasing traffic. 

How to convert my website to an android app and publish it to Google Play Store for free? 

--- On your Desktop or Mobile browser, go to www.mymobileapp.online

--- On this page enter the URL of your website and click Get Started. 


--- On the next page enter the name of your app and select an icon for the app.


--- On the next page add your Contact Details.

--- On the next page select the plan you want to have. Select the Free plan. 

Also, read: How to register a free domain and free hosting for Blogger | Blogger Tutorials

Keep a note here. If you select the Free plan then your website will only be converted to an Android app and will only be published on Google Play Store. If you want to upload your app to Apple app store then upgrade your free account to a premium account. Well, we all know Android is a very big platform so you can just let it be on Google Play Store. If you are having the budget then upgrade your account and your app will be published on Apple app store too. 

Anyways, after selecting the free plan you will be logged in to your dashboard, or you just signup and login to your dashboard. It will look like this. (You can see my app is live on Google Play Store as I have a free account).


IMPORTANT POINT TO NOTE: It will take 5days to a week for your app to be developed and verified and uploaded to the GOOGLE PLAY STORE. Once your app is live on Play Store you will be notified through an E-mail to you. 


Just be patient and wait for your app to be developed and approved by google play store.

 After your app is live on play store you can share the link to it to your friends and social media platforms. This will increase traffic on your blog. 

That's all for now.

Hope this article was useful to you.

Do Like, comment and share. This will appreciate us.

Subscribe us through your email to get more tech related info and other stuffs we write directly to your inbox.

We are live on Google Play store. Click on the badge below to get us directly from play store.


February 26, 2018

How to register a free domain and free hosting for blogger | Blogger tutorials

Hi

Today we will know how to register a free domain and host it for free using blogger.

Generally, we need to pay for registering a domain and also pay for hosting it on the web and that too for a limited time, say for a month, and then again we need to pay for the hosting. So much hustle bustle, right? Well, there is a method to do it for free. Let's see.

Why use a custom domain when I can use blogspot.in or blogspot.com domain?

Using a custom domain has some benefits. Like-

  • First of all, a blogspot.in domain name doesn't look professional at all.
  • A custom domain is easy for people to search for your website. Nobody would like to type "example.blogspot.in" and waste time, frankly speaking.
  • For a better Google ranking and for a good SEO, it is necessary to have a custom domain.
  • For Google Adsense approval and also for using other monetization ways it is very helpful if you have a custom domain name.

Do I need to pay for a custom domain?

Well, if you want to go for a .com or .in domain, then you need to pay for registering them because they are top-level domains. If you are not interested to spend money on domain registration and all then continue through this article, or else you can go down and look at How to host a custom domain for free using Blogger.

How can I get a custom domain for free?

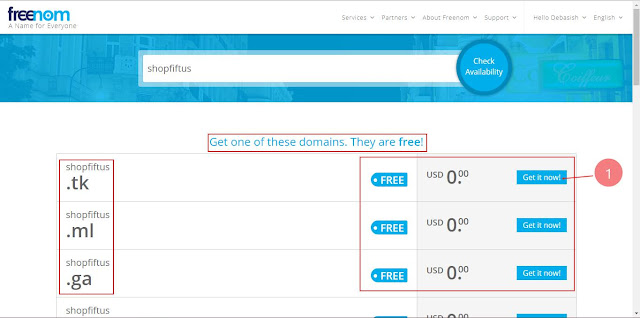
This is the section you all are waiting for, admit it ;). Yes, you can get a custom domain for free for a year. For this- go to Dot.tk. Then follow the steps-

          1. Login to your Freenom Account or SignUp.

          2. Type the name of your blog for which you want to get a custom domain.

          3. Then click on Check Availability.


--You will get a page with all the available free and paid domains for your blog according to the name you provided. Click on Get it Now!


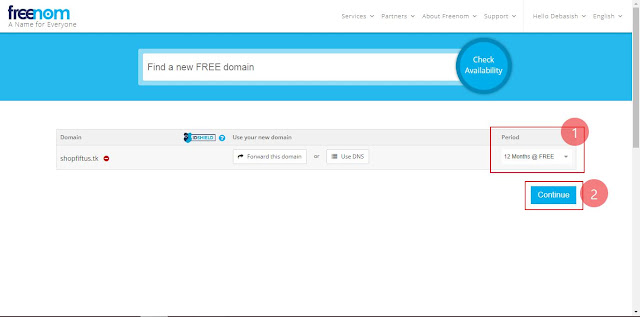
--After clicking on Get it now!, click on the Checkout option on the top left.

--Then, on the next page click on the box below the Period option and select the 12 Months @ FREE option.

--Then, click on Continue.


--On the next page, scroll down a little and fill the form with your details. Then, click on Terms and Conditions Agreement. Then, Complete Order.


--On the next page, click on Click here to go to your client area.

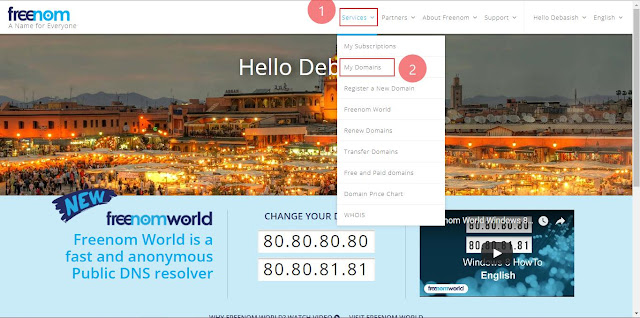
--On this page, got to Services and then click on My Domains.


--On this page, you will see the status of your domain. It is registered and active. You can see the Registration date and the Expiry date of your domain. The status should be Active, which means that your site is registered


Now your site is registered for free. But it is not hosted on the Internet yet. A lot of you may be thinking how to host it on the internet and link this custom web address with your blogger blog.

Let's find out the answers to your questions.

How to host my web custom website address on the Internet for free and link it to blogger blog?

Some of you know and some of you don't that blogger offers free web hosting of your custom web address. To do this, follow these steps-

       1. Go to blogger.com and log in to your blog.

       2. On the left sidebar, click on Settings>Basic. 

       3. Under the Publishing option locate and click +Add a third party URL to your blog.

       4. Then on the box, type your registered web address as www.example.tk. Remember to add www. Otherwise, the address will not get linked. Then, click on save. You will get a page like the image below.


This is an error message, but hey, don't worry. This is normal. Just follow the next steps. Lemme tell you what the message actually means. The message reads We have not been able to verify your authority to this domain. Error 9. That means blogger is not able to verify that this domain belongs to you because they can't host your domain without verifying your authenticity to this domain or in simple words they need to verify that the domain provided by you belongs to you. And then we have Name, Label or Host field and Destination, Target or Points To field. Follow these steps to set them up accordingly.

1) Open a new tab and got to Dot.tk and login to your account.

2) Go to Services>My Domains. On this My Domain page click on Manage Domain.


3) On the next page click on Manage Freenom DNS. 

4) Here on this page, you will see a blank record. Click on +More Record. This will create another blank record.

5) Now, under the Type option, you will see A. Change it to CNAME for both the record.

6) You are nearly done. Now go to the tab where blogger is open and you have the 

NameLabel or Host fieldDestinationTarget or Points To field.

From here copy the first name which is www. Now go to the tab where you have the blank records and paste the www in the Name field in the first record. Now go to the blogger tab and copy the words under the Target option which will be ghs.google.com. Now go to the record page and paste it into the Target field in the first record.

Now go to the blogger tab and copy the second Name and then paste it under the Name option in the second record. Now go to the blogger tab and copy the words under the Target option and then go the record tab and paste it into the box under the Target option. Now click on Save Changes.

Follow the image below to understand clearly.


Remember, if you don't complete this steps, blogger will not be able to verify your domain and you can't host it. So do make sure to enter the correct names and targets in their correct order as described in the points above.

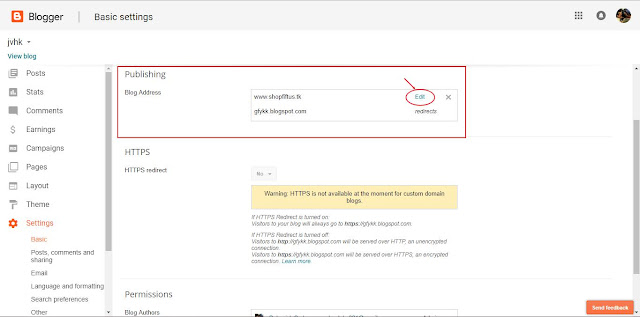
After Saving the Changes in the DNS MANAGEMENT, Click on BACK TO DOMAIN DETAILS. Then go to the blogger tab and wait for a few minutes, say for 5 minutes. After that click on the save option. You will see SETTINGS WERE SAVED SUCCESSFULLY which means blogger verified your domain. Now click on edit


Now select the box which says Redirect shopfiftus.tk to www.shopfiftus.tk. This is done so as to redirect your blogspot.in domain to your custom domain. If you have distributed your blogspot.in domain to your friends and social media platforms after you created your blogs then everyone will go to yourblog.blogspot.in every time they want to visit your blog. But you had changed the domain to a custom domain so if you don't redirect your Blogspot.in domain to your custom domain then people who have your blogspot.in domain will not be able to find your site because you changed it to a custom domain. So, in that case, redirects helps. After you Redirected your blogspot.in to your custom domain by selecting that box, people who will type yourblog.blogspot.in will automatically be directed to your custom domain address yourblog.tk. 


(follow the image for redirection)


That's all for now. Hope this article is helpful. Contact us if you face any problem following the steps above or if you are stuck somewhere between the steps. We will respond to you ASAP. You can also post your problems (if any) and suggestions in the comment section.

Please do like and share. 

You can subscribe with your email. All the latest posts will directly go to your email. 

We are on GOOGLE PLAYSTORE now. Click on the badge below to get our app directly from the Google Playstore.